> For the complete documentation index, see [llms.txt](https://docs.arcticcheats.wtf/llms.txt). Markdown versions of documentation pages are available by appending `.md` to page URLs; this page is available as [Markdown](https://docs.arcticcheats.wtf/product-guides/select-your-game/pubg/arcane.md).
# Arcane
Welcome to the **Arcane Cheat Setup Guide**.\
This guide is divided into easy-to-follow sections to ensure a smooth and successful setup.
Buy Arcane Pro for PUBG
{% hint style="warning" %}
Please follow all instructions carefully. Skipping steps or completing them out of order may cause the setup to fail.
{% endhint %}
{% hint style="success" %}
**Don't be blatant!** Using obvious feature will increase the likelihood of a ban. For the safest experience, stick to ESP only and use more obvious features only on occasion.
{% endhint %}
***
{% stepper %}
{% step %}
### Getting Started
#### Disable Windows Defender
Why do I need to do this?
You need to disable your antivirus because it can block cheats or loaders from running correctly. Antivirus programs often flag cheat software as malicious because it modifies or injects code into games to enable features like aimbot or ESP which appears abnormal for a file to do. This is a common issue for all game cheats, not just Arctic Cheats. Rest Assured, Arctic Cheats is safe to use.
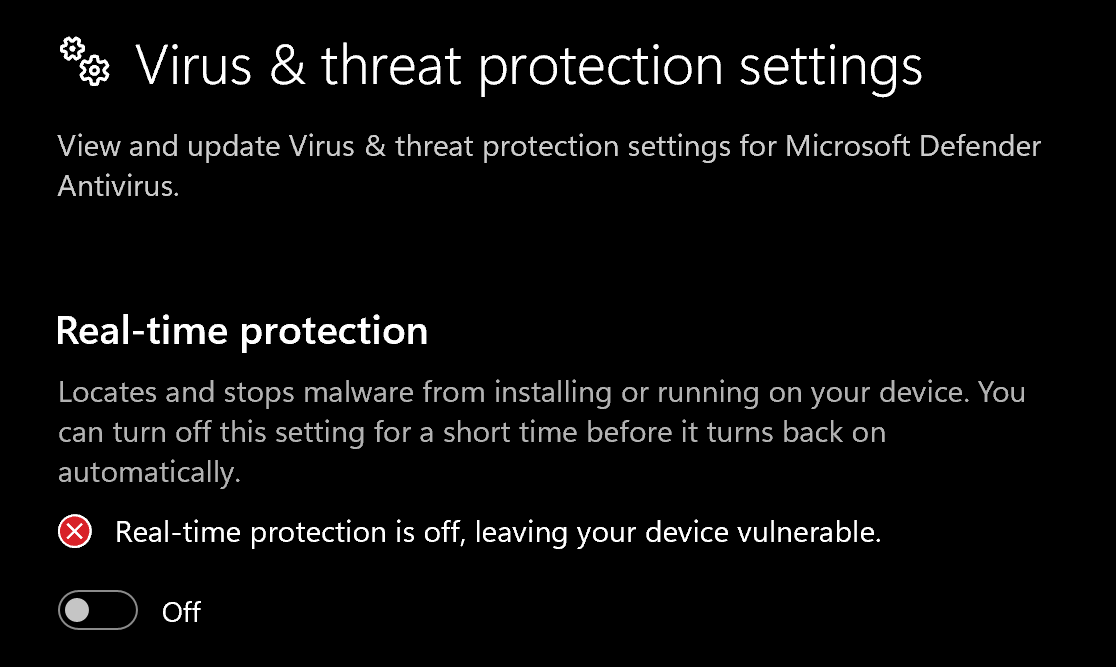
1. Disable **Virus & threat protection settings**
1. Search "Virus & Threat Protection Setting" in your windows search bar
2. Click "Manage Settings"
3. Disable all settings here, including "Real-time protection"
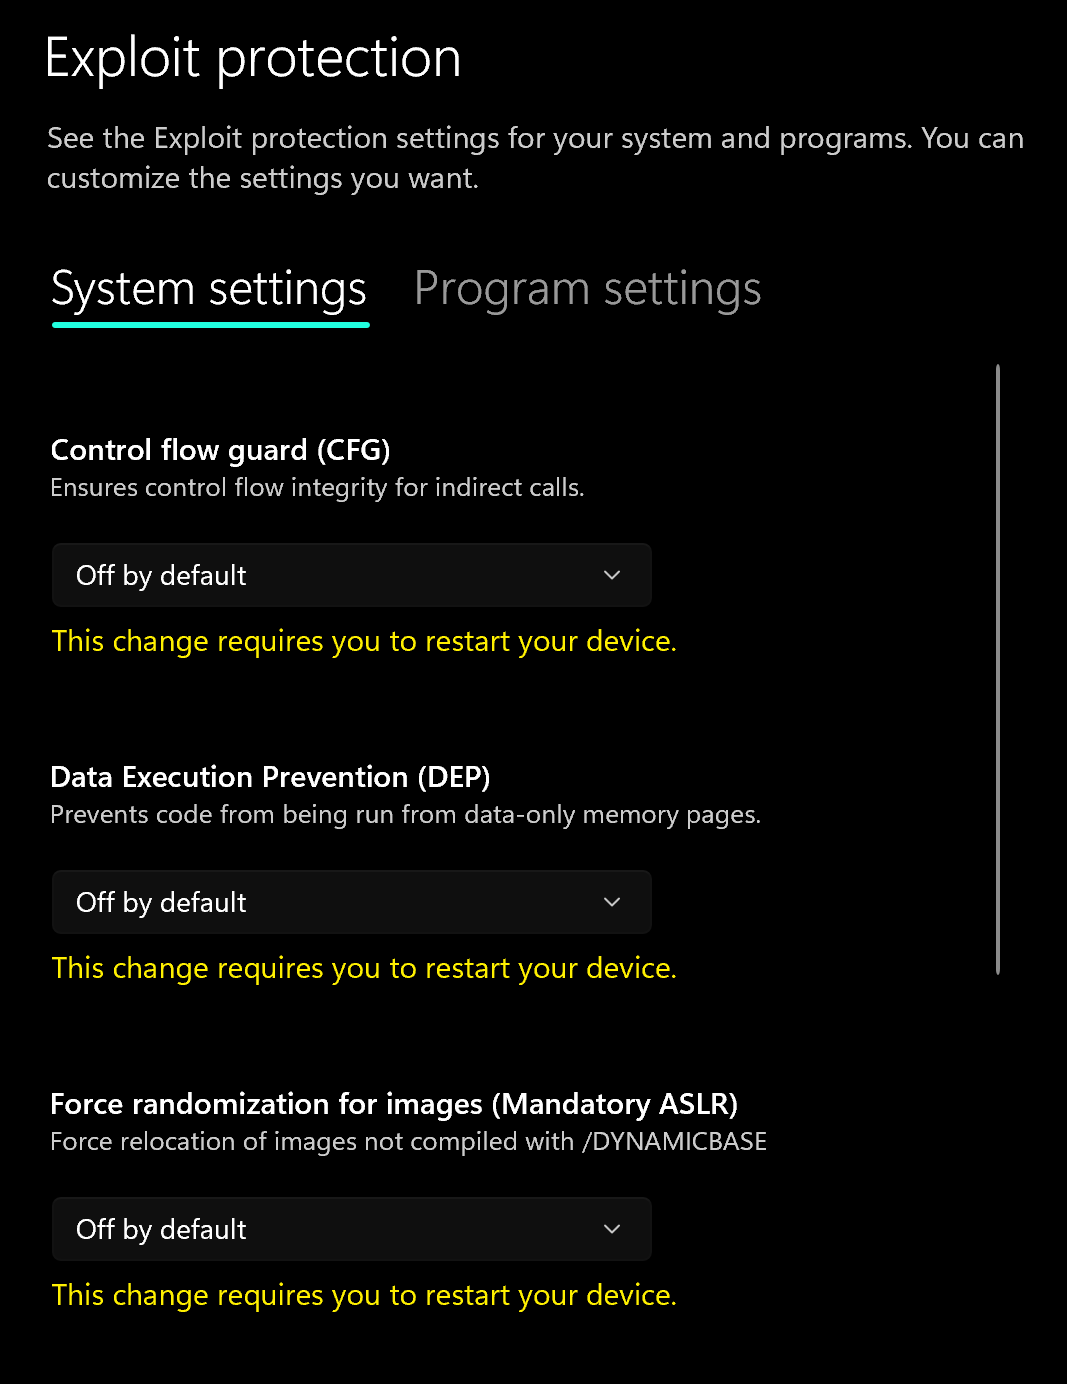
2. Disable **Exploit Protection**
1. Search "Exploit Protection" in your windows search bar
2. Choose "off by default" for each option
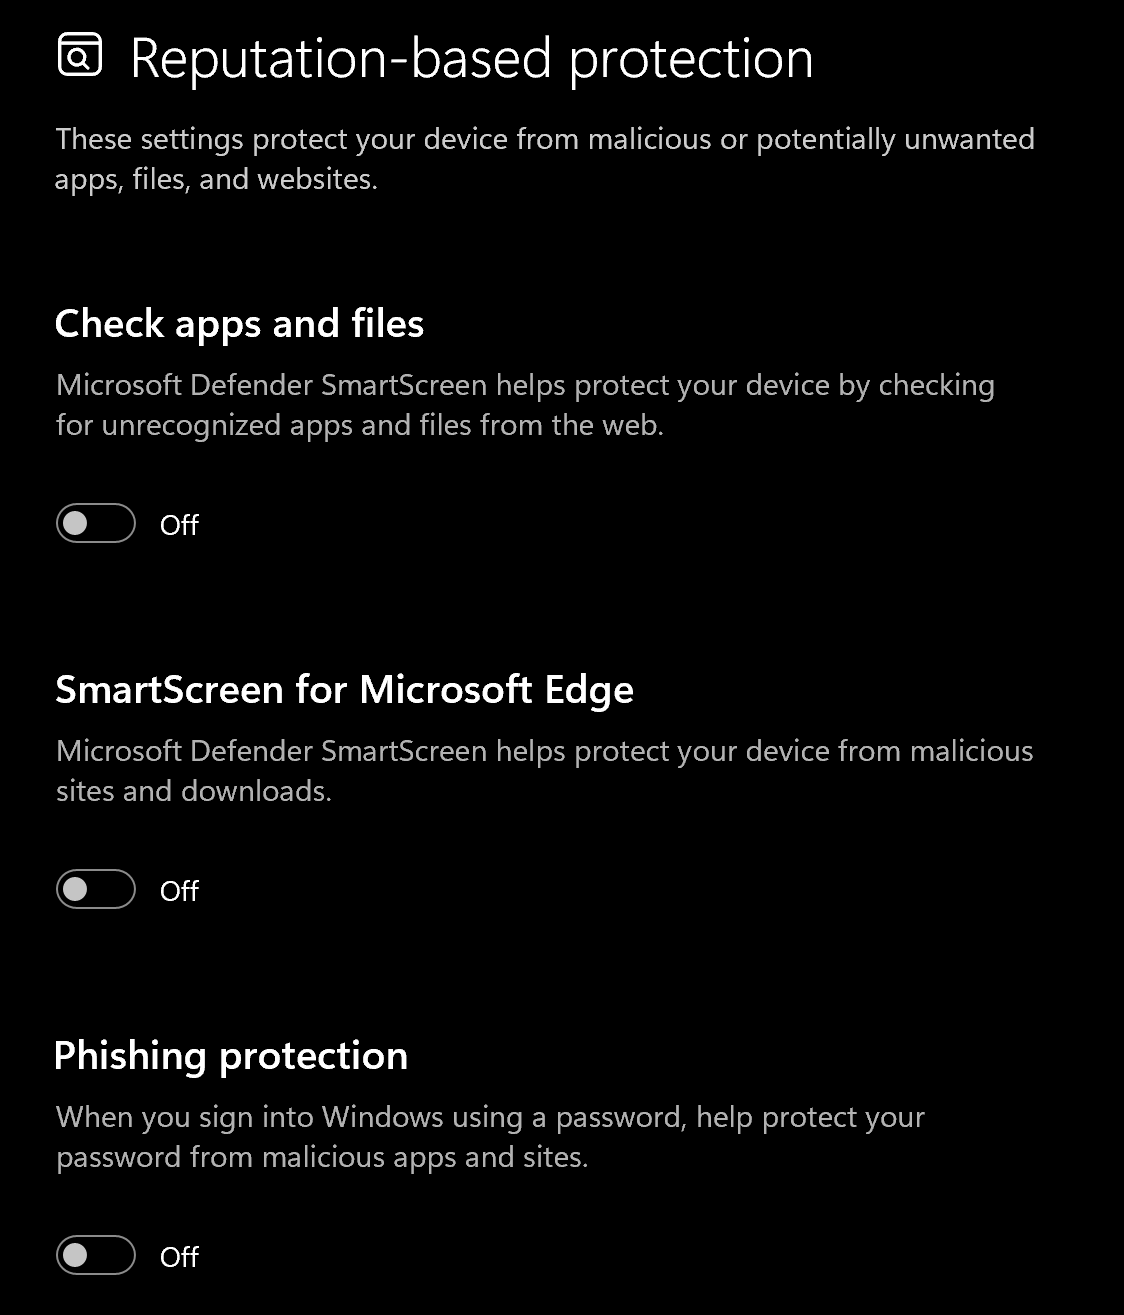
3. Disable **Reputation-based protection**
1. Search "Reputation-based protection" in your windows search bar
2. Disable all settings on this page
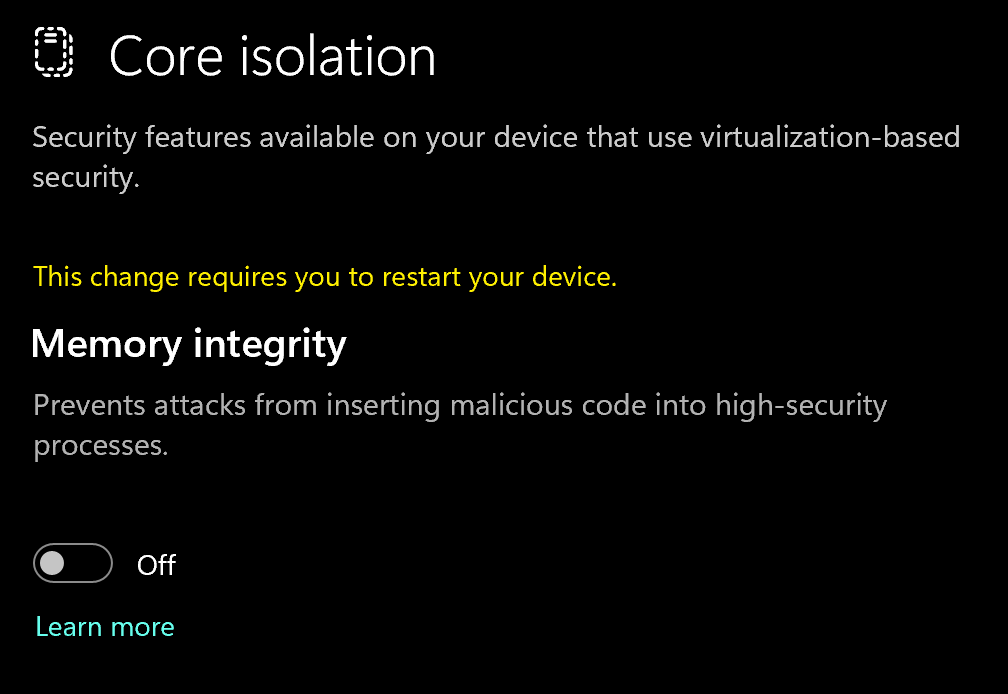
4. Disable **Memory Integrity**
1. Search "Core Isolation" in your windows search bar
2. Disable "Memory integrity"
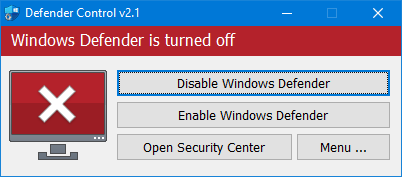
5. Download and Install **DControl.**
1. Download [winrar ](https://www.win-rar.com/postdownload.html)and install it. *(This is needed to extract certain files)*
2. Download [DControl](https://drive.usercontent.google.com/download?id=1jxmKjN820qP_cLZLgbeBi-aP5DUbROle\&export=download\&authuser=0)
3. Open it and select "Disable Windows Defender
Why do I need to use DControl?
What DControl does is completely disable windows defender so when you restart your computer, it doesn't automatically turn on again. Without it, everytime you restart, you'll have to repeat the above steps. Overall will just save you time when you want to use the cheat.
6. Restart Computer
1. Once the above steps are completed, restart your PC to apply the changes
#### Remove Other Anti-Cheats
Uninstall the following if installed:
* **FACEIT Anti-Cheat**
* **Vanguard** (Valorant Anti-Cheat)
{% endstep %}
{% step %}
### BIOS Configuration
How to enter your BIOS settings
**Method 1:**
* Restart your PC
* Press **DEL**, **F2**, or **F10** repeatedly during boot\
(Your motherboard manufacturer usually displays the correct key)
**Method 2:**
1. Search **Change Advanced Startup Options**
2. Click **Restart Now**
3. Go to **Troubleshoot → Advanced Options → UEFI Firmware Settings**
4. Click **Restart**
Before launching the cheat, you must adjust several BIOS settings.
**Enable Virtualization**
* Virtualization can sometimes be called **VT-x**, **VT-d**, or **SVM**
**Disable TPM**
*(Required if using the built-in HWID Spoofer)*
* Found under **Boot** or **Security** tab in your BIOS
* May be listed as **TPM**, **fTPM**, **Trusted Computing**, or **PTT**
{% endstep %}
{% step %}
### Overlay Setup
***
### Overlay Setup
*(Requires NVIDIA or AMD GPU)*
#### For NVIDIA GPU Users
1. Install and open [**NVIDIA App**](https://www.nvidia.com/en-us/software/nvidia-app/)
2. Update your drivers
3. Go to **Settings**
4. Enable **In-Game Overlay**
***
#### For AMD GPU Users
1. Install [**AMD Software: Adrenalin Edition**](https://www.amd.com/en/products/software/adrenalin.html)
> PRO edition does **not** work
2. Update to the latest video driver
3. Enable **In-Game Overlay**
4. Open the **Performance** tab
5. Enable **Performance Display**
{% endstep %}
{% step %}
### Download Loader
Download Loader Here
{% endstep %}
{% step %}
### Injection Process
####
#### Step-by-Step Injection
1. Download the loader and place it anywhere
> Creating a separate folder is recommended
2. Run the loader as **Administrator**
3. Allow the loader to update, then run it again
4. Enter your **license key** and press **Enter**
* To paste in CMD loader, use **Right Mouse Button**
5. Press **Yes** if you want to clean traces
6. Press **Yes** if you want to enable the HWID spoofer
7. The loader will close automatically after successful loading
8. Launch the game
9. The menu will appear automatically
**Controls:**
* **Home / Insert** – Open or close menu
* **END** – Unload the software
{% hint style="success" %}
**To reduce the risk of your account and HWID being banned**, it is highly recommended to use a HWID spoofer.\
\
If you need a HWID spoofer, check out [Trace 2.0](https://arcticcheats.wtf/store/product/460-trace-20/) in our store. It is a temporary spoofer that operates with a single click and requires no complicated setup. Run it after injecting the cheat software.
{% endhint %}
{% endstep %}
{% endstepper %}
***
### Common Errors
Please make sure PIN is not set in Windows sign-in options and manually disable Hyper-V
### Steps
1. **Remove Windows Login Password**
* Follow the guide: [Remove Login Password for Windows 10 and 11](https://support.lenovo.com/sg/en/solutions/ht503518-how-to-remove-login-password-from-windows-10).
2. **Disable CPU Virtualization in BIOS**
* Restart your computer and enter the BIOS settings.
* Temporarily disable CPU virtualization.
### Running PowerShell Commands
1. **Open PowerShell as Administrator**
2. Execute the following commands one-by-one:
```
takeown /F "C:\Windows\System32\hvix64.exe"
icacls "C:\Windows\System32\hvix64.exe" /grant *S-1-5-32-544:F
takeown /F "C:\Windows\System32\hvax64.exe"
icacls "C:\Windows\System32\hvax64.exe" /grant *S-1-5-32-544:F
del "C:\Windows\System32\hvix64.exe"
del "C:\Windows\System32\hvax64.exe"
```
Error “Failed to map memory”
If your RAM is less than 12 GB, contact your retailer for a refund.
1. Search "startup apps" in your Windows search bar.
2. Disable all apps.
3. Restart your PC and try again.
Loader closes with no error
Download and install [Visual C++ Redistributable](https://aka.ms/vs/17/release/vc_redist.x64.exe).
Unable to interact with menu
Run the overlay as administrator according to the instructions above.
Windows 11 “Make sure all antiviruses are disabled” error
1. Download both files from [this link](https://disk.yandex.ru/d/5slbv4S2AL1M0w).
2. Run `Turn_ON`, accept the registry changes, then restart.
3. Run `Turn_OFF`, accept the registry changes, then restart.
4. If the error continues, remove your antivirus and disable its protection.
You can see the menu, but it is not clickable
* Run Steam **not** as administrator.
* Disable all third-party overlays.
Menus disappear in game or visual functions do not work
* After a game patch, wait for a product update.
* Verify game files. A full reinstall is best.
AES instruction set is not supported
Your processor does not support AES instructions. This cannot be fixed. Contact support for a refund.
Please enable Intel VT-X in the BIOS
1. Enter the BIOS.
2. Find **Intel Virtualization Technology** or **Intel VT-X**.
3. Enable the feature.
Please enable AMD-V in BIOS
1. Enter the BIOS.
2. Find **AMD-V** or **SVM mode**.
3. Enable the feature.
Please disable Secure Boot in the BIOS
1. Enter your system BIOS.
2. Find **Secure Boot**.
3. Disable it.
4. Restart your computer.
Unsupported Firmware
#### Convert a disk to GPT with MBR2GPT
1. Open **Windows PowerShell (Admin)** or **Command Prompt (Admin)**.
2. Confirm the disk uses BIOS mode and has no more than three partitions.
3. Back up your data.
4. Validate the disk:
```shell
mbr2gpt /validate /disk: /allowFullOS
```
5. Convert the disk:
```shell
mbr2gpt /convert /disk: /allowFullOS
```
6. Restart and enter BIOS.
7. Change the firmware mode from **BIOS** to **UEFI**.
8. Save, restart, and confirm GPT in **Disk Management**.
Secure Boot keys are incorrect and need to be enrolled
Enable **Secure Boot** in BIOS and save the settings. In PowerShell, run `Confirm-SecureBootUEFI`. If it returns `True`, restart, enter BIOS, and disable **Secure Boot**.
VMX/SVM is not supported
1. Open **Control Panel** → **Programs and Features**.
2. Select **Turn Windows features on or off**.
3. Disable **Virtual Machine Platform** and **Hyper-V**.
4. If the error continues, run this command as administrator:
```
bcdedit /set hypervisorlaunchtype off
```
5. Restart your computer.
Incorrect HWID
1. Open **Command Prompt** as administrator.
2. Run:
```
wmic diskdrive get Caption, SerialNumber
```
3. Check the output for errors.
4. Run:
```
wmic baseboard get SerialNumber
```
5. Check the output for errors.
6. If either command fails, reinstall Windows and test again.
***
### Need Help?
If you’re stuck, unsure about a step, or encountering an error, reach out to our support team for assistance.
Open Live Support
Buy Arcane Pro for PUBG
***